There might be situation when you need to change WordPress table prefix AFTER the installation. Let’s say, the default prefix was used during installation, but later you decided to change “wp_” into something meaningful. For example, you need to merge several similar WP installations into a single database – they can perfectly co-exist given that each installation uses its own set of tables. Table prefix helps to separate those sets.
It may also improve security since any SQL injection would fail if the table name was not guessed right. Some argue, that hacker would use $wpdb->prefix variable to bugger your database. However, $wpdb->prefix variable may not always be available if WP environment was not loaded/initialised properly (which is often the case with SQL injections). After all, this may make hacker’s life more difficult and persuade him to look for an easier target.
So, here are steps to change WordPress table prefix. In the following example, the default table prefix “wp_” will be replaced with something else, let’s say, “smth4965_”.
- Yes, we all read-and-ignore warnings but please make sure to do database backup before making any changes.
- Stop Apache (but leave MySQL running). You don’t want someone accessing your web site and running WP engine while half of tables are there and the other half isn’t. Another option is to put your site into maintenance mode – if doing that, make sure that all the connections to the database in question have been closed.
- Edit
wp-config.php: change$table_prefix = 'wp_';
into$table_prefix = 'smth4965_';
Don’t forget to save the config file. - Run MySQL client and connect to the database. Run the following query:
SELECT option_name FROM wp_options WHERE option_name LIKE 'wp\_%';
Backslash is required to escape the underscore, otherwise it is treated by MySQL as a control character. There should be one record,wp_user_roles. Change it:UPDATE wp_options SET option_name = 'smth4965_user_roles' WHERE option_name LIKE 'wp\_%';
In future WP versions, there might be more records – so be careful. Make sure there is no error message, and exactly one row was updated. Execute this to check:SELECT option_name FROM wp_options WHERE option_name LIKE 'smth4965\_%';
Exactly one record means everything is fine, continue to the next step. - Edit several records in the table
wp_usermeta. It is difficult to predict how many, because there will be different records for different WP versions and different installations. This is where plugin (or any other automated process) cannot be trusted, unless created specifically for your installation. Run the following query:SELECT meta_key FROM wp_usermeta WHERE meta_key LIKE 'wp\_%';
Here is one of the possible outputs: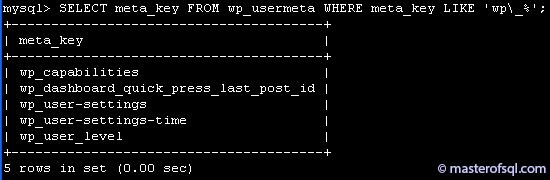
There are five keys that need to be changed. In theory, this could be done automatically, but there is a catch. Looking at the code of one of plugins found on the internet, we can notice that the code is only aware of three keys out of five: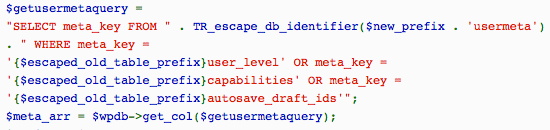
Moreover, one of those three keys is wrong, so in total only 2 out of 5 keys would be updated. Obviously, this code was fine for a particular (possibly, older) version of WordPress – but not for the current one. That is why I suggest to run the query above and find all the keys manually (as there might be more keys appearing in the future). So, here are the queries to update all the keys FOR THIS PARTICULAR INSTALLATION:UPDATE wp_usermeta SET meta_key = 'smth4965_capabilities' WHERE meta_key = 'wp_capabilities'; UPDATE wp_usermeta SET meta_key = 'smth4965_dashboard_quick_press_last_post_id' WHERE meta_key = 'wp_dashboard_quick_press_last_post_id'; UPDATE wp_usermeta SET meta_key = 'smth4965_user-settings' WHERE meta_key = 'wp_user-settings'; UPDATE wp_usermeta SET meta_key = 'smth4965_user-settings-time' WHERE meta_key = 'wp_user-settings-time'; UPDATE wp_usermeta SET meta_key = 'smth4965_user_level' WHERE meta_key = 'wp_user_level';Make sure all five queries executed without errors, and each query has updated exactly one record. - Rename all the tables: either using
ALTER TABLEstatement, or via PHPMyAdmin. Currently, WP installation contains 11 tables. Rename all of them. - [Optional] Run database checks to make sure everything is fine, as described here.
- Start Apache.
Test that site works (both front and back sides). I had a client, who tried renaming tables and changing table prefix in the wp-config.php, without completing steps 4 and 5. Interestingly, the front side worked fine. The problem was only discovered when he tried to log in to the WP admin panel and got message “You do not have sufficient permissions to access this page”. After completing two missing steps, the problem was resolved.
2,511 total views, 2 views today